Tutorial | Creating a form With react + redux
Introduction
Working as a software engineer I was faced with the daunting task of creating a large collection of forms while using React. After several tries and improvements I adopted several design principles that I will be presenting in this tutorial. They greatly helped me in my task and I feel that sharing them could benefit other peoples creating forms in React.
Before presenting these principles, I would like to discuss quickly the tools/frameworks I used and thus explain how their features influenced the emergence of the principles I will be presenting.
I recommend being familiar with React to understand this tutorial. To learn more about react, I would strongly recommend you reading these articles:
React
React, with its emphasis on component reusability is a powerful tool when it comes to creating easily maintainable and scalable web applications. But it does not provide an efficient way to handle data on a global scale. The built-in state as in the following example:
import React, { Component } from 'react';

class Component extends Component {
  constructor() {
    this.state = {
      someData: 'someData'
    };
  }

  render() {
    return (<span>{this.state.someData}</span>)
  }
}
Is very intuitive, well documented and allows to quickly create components with controlled elements.
Nevertheless, as soon as you start creating more complex pages with several subcomponents that require state to be passed down to them such as here:
import React, { Component } from 'react';
import PropTypes from 'prop-types';

const SubComponent = ({subData}) => (
  <span>{subData}</span>
);

SubComponent.propTypes = {
  subData: PropTypes.any.isRequired,
};


class Component extends Component {
  constructor() {
    this.state = {
      someData: 'someData',
      subData: 'subData'
    };
  }

  render() {
    return (
      <span>{this.state.someData}</span>
      <SubComponent subData={this.state.subData} />
    )
  }
}
Where we are passing data from the component’s state to the subcomponent’s through the props it becomes more difficult to keep track of the relationship between the states of all components and to know what part of the state currently holds what value. Overall I think that it becomes a lot more tricky and mind hassling when your app grows in size and complexity.
At that point you should be asking, what is your miracle solution to handle your components data then?

Redux
Redux provides an answer to this issue by enabling to add a data layer on top of you react app through the store.
By providing the store (which is an object) to all specified components, redux makes data easily available and sharable in the entire application. This is exactly the kind of features that you are looking for when you are looking to create a form.
Quite quickly, redux relies on reducers, which are functions, to handle all data update of the store. These reducers are listening for actions which will tell them what change to make.
By adding thunks, which are sets of functions that handle organisation of the actions emitted and thus the modification of data in the store, we get a very powerful and extensive tool to handle data modification.
This makes handling all the application data through redux feel very natural and a lot more organised.
Our app
Now that you are accustomed with both React & Redux let’s explain what we will be creating in this tutorial and how we are going to do that.
The goal here is to create an easy to expand model/base for a form following these design principles:
-
All data is to be stored and handled in the redux tree. The big idea behind this is that handling all data in the redux tree will give us a good oversight of all the data and allows to have a lot of flexibility when it comes to adding features and components.
-
Constantly have two versions of the form’s data. One reliable and in sync with the data source. One directly manipulable by the user and that holds the new edited data. This allows the user to easily discard its changes and to see previous values for the fields he is editing.
First step | Set up
Let’s first create our app with the very intuitive create-react-app. You need to have npm (5.2+) installed. Then simply run:
npx create-react-app tuto_react-redux_form
Then let’s install all the dependencies we will need for our tutorial:
-
redux + react-redux: redux itself & its adaptor for react.
-
redux-devtools-extenstion: handy dev tools that lets you access in direct the state of your redux tree and see logs of action and how they affect your tree.
-
redux-thunk: enable asynchronous actions, and thunks to handle complex logic for your state tree.
yarn add redux react-redux redux-devtools-extension redux-thunk
That’s all for the setup !
Second step | Page and components creation
Here are screenshots of the minimalistic form we will be creating:
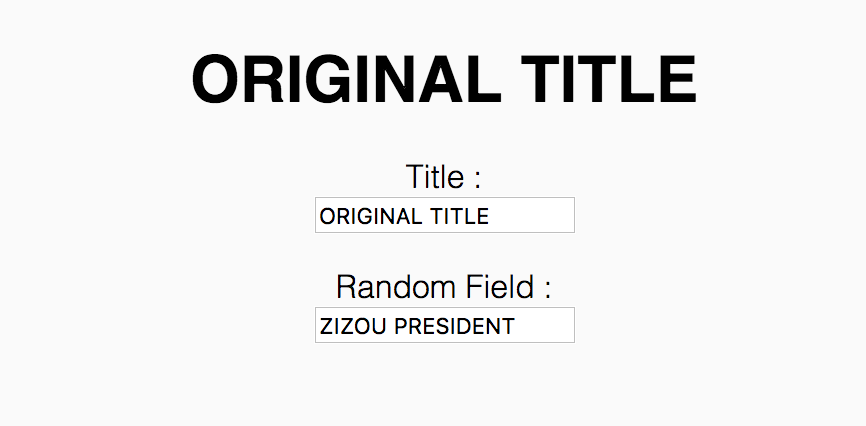
The idea is pretty simple: Have only two fields, with one, the title being shown on its original (as the title of the page) and edited form (in the input field). The second one is only used to give an idea about how to expand this simple example into a fully functional form.
Our page will also feature a save bar that appears each time the user makes a change. We want to have two buttons on this bar:
-
Save button: will save the modifications made by the user (In a full app it would obviously trigger a call to a backend/api, here for simplicity the objective is only to save locally the change.)
-
Discard button: will discard all the modifications of the user and return to the initial state of the form.

How to start ? Let’s split our page into logical entities, or components:
-
Input fields: each input field needs an initial value, a title, and a logical function that will be triggered on the update of the field and used to recover the new value of the field.
-
Save Bar: it is not bound to this page and could very well re-used throughout several form pages.
-
Our page itself, with the title, and that regroups all these component into a coherent entity.
Let’s start with the input field component:
It has 3 properties:
-
handleChange: function triggered on change of the input, transmits the new value of the input to where the Input Field is embedded. -
title: Title of the field, so that the user understands what field is modified. -
value: controlled value of the input field, by receiving it as a prop, we get rid of the state for this (sub) component and delegate the logic to a more appropriate place, the redux tree.

It makes this sub component really both simple and dumb, it does not hold any logic. Its only job as a good executor is to display data it was given and to alert and transmit any change to its superior.
You can think about it as a clone trooper. Good to execute orders but not to think for themselves.
import React  from 'react';
import PropTypes from 'prop-types';

const TextInput = ({handleChange, title, value}) => (
  <div>
    <br/>
    {title}
    <br/>
    <input type="text" value={value} onChange={(event) => handleChange(event.target.value)} />
    <br/>
  </div>
);


TextInput.propTypes = {
  handleChange: PropTypes.func,
  title: PropTypes.string,
  value: PropTypes.string,
};

TextInput.defaultProps = {
  handleChange: (event) => console.info(`New value : ${event.target.value}`),
  title: null,
  value: null,
};

export default TextInput;
Then, for the save bar:
It also has 3 properties:
-
onDiscardAction: function called when the discard button is clicked, as it is a property of the saveBar, it is used to transmit the discard information from the button to the place where the saveBar was invoked. -
open: governs if the save bar is popped up or not. Here again, as it is a property of the saveBar, the logic is delegated to a more suitable place. -
onSaveAction: function called when the discard button is clicked, as it is a property of the saveBar, it is used to transmit the save information from the button to the place where the saveBar was invoked.
import React  from 'react';
import PropTypes from 'prop-types';

import './index.css';

const SaveBar = ({
  onDiscardAction,
  open,
  onSaveAction,
}) => (
  open ?
      <div className="SaveBar">
        <span>Seems like you modified something, want to save it ?</span>
        <button onClick={onDiscardAction}>DISCARD</button>
        <button onClick={onSaveAction}>SAVE</button>
      </div>
      :
      null
);

SaveBar.propTypes = {
  onDiscardAction: PropTypes.func,
  open: PropTypes.bool.isRequired,
  onSaveAction: PropTypes.func,
};

SaveBar.defaultProps = {
  onDiscardAction: () => console.info('Discard'),
  onSaveAction: () => console.info('Save'),
};

export default SaveBar;
Finally, the form page itself:
Here we have to use an actual React component and not a functional component as before because we will need to access the lifecycle of the component. By doing so, we can recover the component’s data from the redux tree at the mounting of the page through:
componentWillMount() {
  this.props.setUpEditableForm();
}
This will allow to load all the form data into our component. We will see more in details what exactly does this function do later.
You should notice once more that we will not be using the state of the component but instead all data is received as directly from the redux tree, meaning that at any time the data inside the component is in sync with the redux tree, where all the data logic is.
Hence you won’t see any call to the set up of a local state, but all data is coming from the props.
import React, { Component } from 'react';
import PropTypes from 'prop-types';
import TextInput from '../../components/TextInput';
import SaveBar from '../../components/SaveBar';

class FormPage extends Component {
  componentWillMount() {
    this.props.setUpEditableForm();
  }

  render() {
    const {
      addChange,
      discardChanges,
      formView,
      formEdit,
      hasChanged,
      saveChanges,
    } = this.props;

    if (!formEdit || !formView) {
      return <span>LOADING</span>;
    }
    return (
      <div>
        <h1>{formView.title}</h1>
        {/* Title */}
        <TextInput
          handleChange={(newValue) => addChange('title', newValue)}
          title="Title"
          value={formEdit.title}
        />
        {/* Field */}
        <TextInput
          handleChange={(newValue) => addChange('field', newValue)}
          title="Random Field"
          value={formEdit.field}
        />
        <SaveBar
          onDiscardAction={discardChanges}
          open={hasChanged}
          onSaveAction={saveChanges}
        />
      </div>
    )
  }
}

FormPage.propTypes = {
  addChange: PropTypes.func.isRequired,
  discardChanges : PropTypes.func.isRequired,
  formView: PropTypes.shape({
    title: PropTypes.string,
    field: PropTypes.string,
  }),
  formEdit: PropTypes.shape({
    title: PropTypes.string,
    field: PropTypes.string,
  }),
  hasChanged: PropTypes.bool,
  saveChanges: PropTypes.func.isRequired,
  setUpEditableForm: PropTypes.func.isRequired,
};

FormPage.defaultProps = {
  formView: null,
  formEdit: null,
  hasChanged: true,
};

export default FormPage;
You should be wondering now why do we have two versions of the form data, the formView and formEdit.
This is one of the key feature of this tutorial:
To always have the data of the form you are displaying in two different forms,
-
The view one is the reliable data, it is the backup data, the one in sync with your database (if there is one unlike here). It is the one displayed in static elements, such as the title of the page and used to recover data from when the changes are discarded for example.
-
The edit one is the data that the user can interact with. When the user changes the value of the title input it will update the form edit data. When the user saves the modification he enacted, the data of the form edit data is kept as the reference/ sent to the backend or API.

Thus the key concept here is the use of both these states, one being the reliable state and the second one being malleable, you can think about your form data as the roman god Janus, with one side facing past (view data), and the second one facing the future (edit data).
Third step | Store creation
Now that you understood what data we will be handling and what is the key principle that I chose to adopt for this form, we have to create a redux tree that is coherent with this choice.
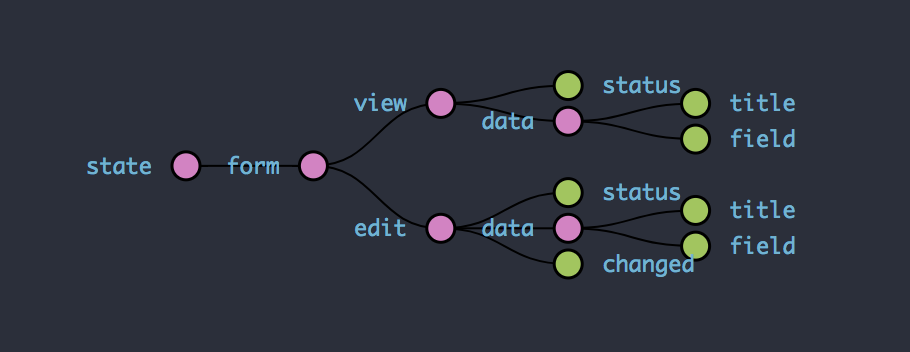
The following graph represents the store we want to create to apply this all-data-in-redux pattern. You can notice the Janusian versions of the data of the form as previously explained.
For the setup of the store, I followed the classic approach of wrapping our App inside a redux provider whose job is to make Redux accessible in the whole app.
import React from 'react';
import { Provider } from 'react-redux';

import configureStore from '../store';

import FormPage from '../containers/FormContainer';

import './App.css';

const store = configureStore();

const App = () => (
  <Provider store={store}>
    <FormPage />
  </Provider>
);

export default App;
The critical step here is to organize correctly the store given to the provider. We only have one page so the general reducer will be very simple:
const reducers = combineReducers({ form: formReducer });
We only add the form page part of the tree to the general store, would we add other pages, we would need to add them here, through their reducers.
To make react-thunk and the devtools available, we need to add the option
composeWithDevTools(applyMiddleware(...[thunkMiddleware])),
to the createStore function.
import { applyMiddleware, combineReducers, createStore } from 'redux';
import thunkMiddleware from 'redux-thunk';
import { composeWithDevTools } from 'redux-devtools-extension';

import formReducer from '../store/form/reducer';


function configureStore(initialState) {
  const reducers = combineReducers({
    form: formReducer
  });

  return createStore(
    reducers,
    initialState,
    // REDUX DEV TOOLS + THUNK EXTENSION ENABLER.
    composeWithDevTools(applyMiddleware(...[thunkMiddleware])),
  );
}

export default configureStore;
That’s all there is to know for the creation and providing of the store to the entire app.
Let’s get into it and create our form reducer.
For this reducer, we will combine two reducers that will handle each version of the data/tree we have, the view and edit.
We will keep the view reducer at its simplest as we don’t have any logic revolving around that (no fetch from the backend/api, the data is hardcoded in the initial state here).
const initialState = {
  view : {
    status: null,
    data: {
      title: 'ORIGINAL TITLE',
      field: 'ZIZOU PRESIDENT',
    },
  },
  edit : {
    status: null,
    data: null,
    changed: null,
  }
};
Let’s thus start with the edit sub-reducer. These are the actions the reducer will have to handle:
- Adding changes: Each time a change is transmitted from the page, we need to update the edited form data and save it with the new value. The most natural way to do this is to get from the page the field being modified and its new value and to use object deconstruction to modify the object.
const newForm = { ...state.data };
newForm[action.fieldName] = action.fieldValue;
-
Saving the form - Pending : When saving the form, being able to know in what stage of the request you are in is really handy. Setting up a status that varies from pending to success/error is a good way to display a loader for example.
-
Saving the form - Success : Once the saving of the form is successful, we would receive the new version of the data from the backend/api.
-
Set up the edited form : This is an important piece of the communication between the view and edited versions of data. On set-up, we wait for the data to load on the view side and once done, we duplicate all the values on the edited side, which makes editable data available for the user. We will see exactly how this is managed later.
import { combineReducers } from 'redux';
import * as constants from './constants';

const initialState = {
  view : {
    status: null,
    data: {
      title: 'ORIGINAL TITLE',
      field: 'ZIZOU PRESIDENT',
    },
  },
  edit : {
    status: null,
    data: null,
    changed: null,
  }
};

function viewReducer(state = initialState.view, action) {
  switch (action.type) {
    case constants.EDIT_FORM_SUCCESS:
      return {
        ...state,
        status: constants.EDIT_FORM_SUCCESS,
        data: action.form,
      };
    default:
      return state;
  }
}

function editReducer(state = initialState.edit, action) {
  switch (action.type) {
    case constants.ADD_CHANGE:
      const newForm = { ...state.data };
      newForm[action.fieldName] = action.fieldValue;
      return {
        ...state,
        changed: true,
        data: newForm,
      };
    case constants.SET_UP_EDIT_FORM:
      return {
        ...state,
        changed: false,
        data: action.form,
      };
    case constants.EDIT_FORM_PENDING:
      return {
        ...state,
        status: constants.EDIT_FORM_PENDING,
      };
    case constants.EDIT_FORM_SUCCESS:
      return {
        ...state,
        changed: false,
        data: action.form,
        status: constants.EDIT_FORM_SUCCESS,
      };
    default:
      return state;
  }
}

export default combineReducers({
  view: viewReducer,
  edit: editReducer,
});
Thunk
The thunk is a collection of functions that handle logic revolving around the store modification. Where the set actions/reducer are purely executional, ex: if X happens then change field Y to the value Z, the thunk’s functions role is to organise these executions in regarding of a larger goal.
export function setupForm() {
  return function _setupForm(dispatch, getState) {
    const form = getFormView(getState());
    dispatch(setNewEditableForm(form));
  }
}
Ex: setting up the edited data. The idea is simple:
-
Get the view data -> Through the
getFormViewselector. -
Make the edit data match it. -> emit a
setNewEditableFormaction with the view data as value.
import {getFormEdit, getFormView} from './selectors';
import { editFormSuccess, editFormPending, setNewEditableForm} from './actions';


export function setupForm() {
  return function _setupForm(dispatch, getState) {
    const form = getFormView(getState());
    dispatch(setNewEditableForm(form));
  }
}


export function saveForm() {
  return function _saveForm(dispatch, getState) {
    dispatch(editFormPending());
    const form = getFormEdit(getState());
    dispatch(editFormSuccess(form));
  }
}
That’s it for the redux tree. We now finally need to connect all of this logic to our component. This is done through a container. The name is pretty self-explanatory. This container well … contains the component and gives it access through the connect method to all the store.
All functions and properties of both mapStateToProps and mapDispatchToProps are passed down as props of the component connected.
import { connect } from 'react-redux';
import FormPage from '../../pages/FormPage';
import { getFormView, getFormEdit, getHasChanged } from "../../store/form/selectors";
import { setupForm, saveForm } from '../../store/form/thunk';
import { addChange } from '../../store/form/actions';

const mapStateToProps = state => ({
  formView: getFormView(state),
  formEdit: getFormEdit(state),
  hasChanged: getHasChanged(state),
});

const mapDispatchToProps = dispatch => ({
  addChange: (fieldName, fieldValue) => dispatch(addChange(fieldName, fieldValue)),
  discardChanges: () => dispatch(setupForm()),
  saveChanges: () => dispatch(saveForm()),
  setUpEditableForm: () => dispatch(setupForm()),
});

export default connect(mapStateToProps, mapDispatchToProps)(FormPage);
It may seems like a lot of coding for such a small form, and it is, nevertheless the design principles I applied reveal all their potential when extending this form by adding features and fields. They thus make this form a good base to quickly start building your own form!
Wrap-up
Thanks a lot for reading this article, I would be immensely thankful for any feedback 👍.
You can find the final code here. Feel free to download the code, to add a visual layer such as material-ui, to link the form to a backend and do whatever you can imagine with it!
I want to Thank rawpixel for the cover photo.